Vault 是安全应用维护人员最喜欢的 hashcorp 产品之一 。Vault 是存储机密、证书、管理策略、加密数据等内容的安全工具。Vault 使用受信任的身份集中密码和控制访问权限,以此减少对静态、硬编码凭证的需求。它使用集中托管和受保护的加密密钥来动态和静态加密敏感数据,所有一切均可通过单个工作流和 API 实现。
Istio 非常重要的一个功能是能够锁定并且保护网格内的来往流量。本文的目的是基于 TLS 启动一个简单的 Web 应用程序,然后使用 Vault 生成对应的安全证书,从而保证 Istio 管理的服务安全。
简单点说,使用 TLS 时候,当您建立连接时,服务器会提供一个公钥,您可以使用此密钥对传输中的数据进行加密,一旦被目标服务器接收,数据将使用私钥解密。为了验证密钥是否有效,可以使用 CA(通常 CA 是付费服务),但我们可以通过 vault 创建一个自签名 CA)。
现在先让我们忽略 vault,让我们在系统上创建一个测试环境。为此使用 kind (https://kind.sigs.k8s.io/) 来快速创建一个测试环境。
用 kind 建立一个 kubernetes 集群下载 kind 后,我们可以定义一个 kind 配置文件来启动 4 个 worker。我们还可以配置一些端口映射,以确保我们可以直接访问入口网关。
kind: ClusterapiVersion: kind.x-k8s.io/v1alpha4nodes:- role: control-planeextraPortMappings:- containerPort: 30725 hostPort: 8080 listenAddress: "127.0.0.1" protocol: TCP- containerPort: 32652 hostPort: 8443 listenAddress: "127.0.0.1" protocol: TCP- role: worker- role: worker- role: worker- role: worker使用 kind 来创建我们的集群
kind create cluster --name chris --config ~/kube.cfg节点已启动
kubectl get nodesNAME STATUS ROLES AGE VERSIONchris-control-plane Ready control-plane 21h v1.24.0chris-worker Ready <none> 21h v1.24.0chris-worker2 Ready <none> 21h v1.24.0chris-worker3 Ready <none> 21h v1.24.0chris-worker4 Ready <none> 21h v1.24.0使用istioctl (https://github.com/istio/istio/releases) 命令安装 istio 。首先让我们定义一下配置内容。因为我们在本地运行,所以我们降低了一些资源要求。
--- apiVersion: install.istio.io/v1alpha1kind: IstioOperatormetadata: namespace: istio-system name: installed-statespec: components: ingressGateways: - enabled: true name: istio-ingressgateway namespace: istio-system pilot: k8s: hpaSpec: maxReplicas: 2 minReplicas: 1 resources: requests: cpu: 512m memory: 512Mi profile: default values: global: istioNamespace: istio-system安装 istio
istioctl manifest install -f ~/istio.cfg删除默认类型的 istio-ingressgateway 的 service。
kubectl delete svc istio-ingressgateway -n istio-system创建一个 NodePort 服务,从而实现从节点端口访问 istio-ingressgateway 。
apiVersion: v1kind: Servicemetadata: labels: app: istio-ingressgateway istio: ingressgateway name: istio-ingressgateway namespace: istio-systemspec: type: NodePort ports: - name: http nodePort: 30725 port: 8080 protocol: TCP targetPort: 8080 - name: https nodePort: 32652 port: 443 protocol: TCP targetPort: 8443 selector: app: istio-ingressgateway应用一下
kubectl apply -f svc.yml此时,istio 应该正常运行。
kubectl get pods -n istio-systemNAME READY STATUS RESTARTS AGEistio-ingressgateway-5f86977657-qfxrs 1/1 Running 0 21histiod-67db665bd9-4d8nl 1/1 Running 0 21h我们将创建一个虚拟网关进行测试
apiVersion: networking.istio.io/v1alpha3kind: Gatewaymetadata: name: gateway namespace: istio-systemspec: selector: app: istio-ingressgateway servers: - port: number: 8080 name: http protocol: HTTP hosts: - "*"同时应用
kind create cluster --name chris --config ~/kube.cfg0使用 curl,我们能够从我们客户端去访问 istio 入口。注意:404 是预期的结果,因为我们还没有配置任何应用程序或 istio 虚拟服务。
kind create cluster --name chris --config ~/kube.cfg1我们不仅连接了(即使我们得到了 404 ),而且您可以看到服务器是 istio-envoy 响应,这意味着 envoy 正在处理流量。
最后一步,让我们创建一个命名空间并将其标记为 istio 注入以供将来工作。
kind create cluster --name chris --config ~/kube.cfg2如果这是一个生产环境,我们会按照严格标准去调整以及安装 vault,但当前只是一个一次性的测试环境,所以我们不做任何优化调整。
使用 helm 安装 Vault Chart
kind create cluster --name chris --config ~/kube.cfg3Vault pod 启动了,但它还没有就绪,因为它当前处于锁定状态。在 pod 中执行以下命令以解封。
kind create cluster --name chris --config ~/kube.cfg4从 /tmp/token.josn 中取出 unseal_keys_b64 密钥,并使用它来解封 vault。
kind create cluster --name chris --config ~/kube.cfg5现在,vault 应该已解封并处于就绪状态。
kind create cluster --name chris --config ~/kube.cfg6现在,我们可以使用 port-forward 来转发访问 vault,并使用可以在 /tmp/token.json 中找到的根令牌登录 vault。
kind create cluster --name chris --config ~/kube.cfg7现在 vault 已准备就绪,让我们创建一个新的 secret engine,启用新 engine -> PKI Certificates,我使用的是 pki/ 路径。或者,如果启用了 cli,您可以使用以下命令
kind create cluster --name chris --config ~/kube.cfg8将 vault 二进制文件下载到您本地并设置 vault 地址和令牌。
kind create cluster --name chris --config ~/kube.cfg9现在我们可以从 cli 与 Vault 进行交互了
kubectl get nodesNAME STATUS ROLES AGE VERSIONchris-control-plane Ready control-plane 21h v1.24.0chris-worker Ready <none> 21h v1.24.0chris-worker2 Ready <none> 21h v1.24.0chris-worker3 Ready <none> 21h v1.24.0chris-worker4 Ready <none> 21h v1.24.00我们想给 istio 一个证书以供 CA 验证,所以让我们在 Vault 中创建一个。首先调整一些租期时间(10 年)。
kubectl get nodesNAME STATUS ROLES AGE VERSIONchris-control-plane Ready control-plane 21h v1.24.0chris-worker Ready <none> 21h v1.24.0chris-worker2 Ready <none> 21h v1.24.0chris-worker3 Ready <none> 21h v1.24.0chris-worker4 Ready <none> 21h v1.24.01创建一个名为 allowit 的角色,然后定义要发送到 CA 的 CSR 的路径。本处将使用域名 somecompany.com 进行所有测试。
kubectl get nodesNAME STATUS ROLES AGE VERSIONchris-control-plane Ready control-plane 21h v1.24.0chris-worker Ready <none> 21h v1.24.0chris-worker2 Ready <none> 21h v1.24.0chris-worker3 Ready <none> 21h v1.24.0chris-worker4 Ready <none> 21h v1.24.02我们当前在做的是为访问路径设置角色以与 CA 一起使用。
现在是时候获得中间证书了。CA 虽然很不错,它确认了证书属于正确的人,但它有很大的权力。中间证书基本上是一种从另一个 CA 创建 CA 的方法。最佳做法是使用中间证书。根证书将能够撤销任何中间 CA。
但如下所见,步骤类似,我们现在使用的是 pki_int 路径。
kubectl get nodesNAME STATUS ROLES AGE VERSIONchris-control-plane Ready control-plane 21h v1.24.0chris-worker Ready <none> 21h v1.24.0chris-worker2 Ready <none> 21h v1.24.0chris-worker3 Ready <none> 21h v1.24.0chris-worker4 Ready <none> 21h v1.24.03仍然使用 somecompany.com 域名,确保颁发者名称与根 CA 和中间 CA 的颁发者名称相同(在此示例中仅称为 root)。
将签名的证书写回 vault 。
kubectl get nodesNAME STATUS ROLES AGE VERSIONchris-control-plane Ready control-plane 21h v1.24.0chris-worker Ready <none> 21h v1.24.0chris-worker2 Ready <none> 21h v1.24.0chris-worker3 Ready <none> 21h v1.24.0chris-worker4 Ready <none> 21h v1.24.04现在我们的 CA 和中间证书已经创建好了。我们应该为它创建一个角色。
kubectl get nodesNAME STATUS ROLES AGE VERSIONchris-control-plane Ready control-plane 21h v1.24.0chris-worker Ready <none> 21h v1.24.0chris-worker2 Ready <none> 21h v1.24.0chris-worker3 Ready <none> 21h v1.24.0chris-worker4 Ready <none> 21h v1.24.05目前,我们都准备好了!我们已经创建了一个带有 vault 的 CA 和中间 CA!
让我们测试一下!让我们向 vault 申请 chris.somecompany.com 的 24 小时有效证书。(这将返回 CA、证书和私钥)
kubectl get nodesNAME STATUS ROLES AGE VERSIONchris-control-plane Ready control-plane 21h v1.24.0chris-worker Ready <none> 21h v1.24.0chris-worker2 Ready <none> 21h v1.24.0chris-worker3 Ready <none> 21h v1.24.0chris-worker4 Ready <none> 21h v1.24.06本处只关心证书,所以将上面命令返回的base64复制并粘贴到一个临时文件中,然后使用openssl 进行检查。
kubectl get nodesNAME STATUS ROLES AGE VERSIONchris-control-plane Ready control-plane 21h v1.24.0chris-worker Ready <none> 21h v1.24.0chris-worker2 Ready <none> 21h v1.24.0chris-worker3 Ready <none> 21h v1.24.0chris-worker4 Ready <none> 21h v1.24.07从上面的输出可以看出,证书有效期为 24 小时,对 chris.somecompany.com 有效,包含我们要求的所有内容!
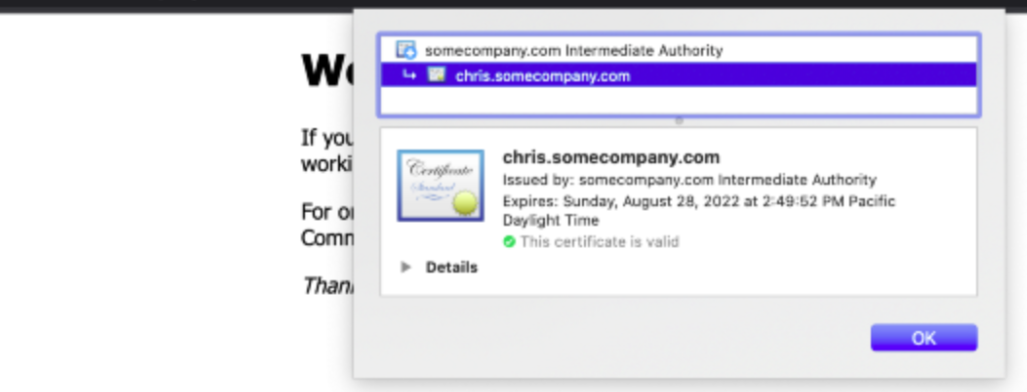
目前的操作都是通过命令行,忽略使用 vault UI,但我们也可以使用 UI 来执行上述所有步骤。例如,我们可以在 UI 上看到我们的证书。
Cert managerkubernetes、istio 和 vault 就这样配置好了。我们的最终目标是启动一个使用 vault 的 TLS 证书的应用程序。
Cert-manager (https://cert-manager.io/) 允许我们向 kubernetes secret api 请求和写入证书。然后 istio 将这些证书与网关 crd 一起使用。
使用 helm 安装Cert-manager
kubectl get nodesNAME STATUS ROLES AGE VERSIONchris-control-plane Ready control-plane 21h v1.24.0chris-worker Ready <none> 21h v1.24.0chris-worker2 Ready <none> 21h v1.24.0chris-worker3 Ready <none> 21h v1.24.0chris-worker4 Ready <none> 21h v1.24.08当前可以确认 pod 已在 cert-manager 命名空间中启动,我们也可以看到 cert-manager crds 被创建了。
kubectl get nodesNAME STATUS ROLES AGE VERSIONchris-control-plane Ready control-plane 21h v1.24.0chris-worker Ready <none> 21h v1.24.0chris-worker2 Ready <none> 21h v1.24.0chris-worker3 Ready <none> 21h v1.24.0chris-worker4 Ready <none> 21h v1.24.09当前 cert-manager 已经启动并运行,它如何对 vault 进行身份验证?Authrole 允许我们设置一个密钥来与 vault 对话。
通过如下命令启用审批
--- apiVersion: install.istio.io/v1alpha1kind: IstioOperatormetadata: namespace: istio-system name: installed-statespec: components: ingressGateways: - enabled: true name: istio-ingressgateway namespace: istio-system pilot: k8s: hpaSpec: maxReplicas: 2 minReplicas: 1 resources: requests: cpu: 512m memory: 512Mi profile: default values: global: istioNamespace: istio-system0创建 policy.hcl 文件,它可以访问 pki/ 和 pki-int 路径
--- apiVersion: install.istio.io/v1alpha1kind: IstioOperatormetadata: namespace: istio-system name: installed-statespec: components: ingressGateways: - enabled: true name: istio-ingressgateway namespace: istio-system pilot: k8s: hpaSpec: maxReplicas: 2 minReplicas: 1 resources: requests: cpu: 512m memory: 512Mi profile: default values: global: istioNamespace: istio-system1写入 vault
--- apiVersion: install.istio.io/v1alpha1kind: IstioOperatormetadata: namespace: istio-system name: installed-statespec: components: ingressGateways: - enabled: true name: istio-ingressgateway namespace: istio-system pilot: k8s: hpaSpec: maxReplicas: 2 minReplicas: 1 resources: requests: cpu: 512m memory: 512Mi profile: default values: global: istioNamespace: istio-system2创建一个 certmanager 角色,该角色附加到 pki_policy vault策略
--- apiVersion: install.istio.io/v1alpha1kind: IstioOperatormetadata: namespace: istio-system name: installed-statespec: components: ingressGateways: - enabled: true name: istio-ingressgateway namespace: istio-system pilot: k8s: hpaSpec: maxReplicas: 2 minReplicas: 1 resources: requests: cpu: 512m memory: 512Mi profile: default values: global: istioNamespace: istio-system3我们现在有一个 role_id
--- apiVersion: install.istio.io/v1alpha1kind: IstioOperatormetadata: namespace: istio-system name: installed-statespec: components: ingressGateways: - enabled: true name: istio-ingressgateway namespace: istio-system pilot: k8s: hpaSpec: maxReplicas: 2 minReplicas: 1 resources: requests: cpu: 512m memory: 512Mi profile: default values: global: istioNamespace: istio-system4让我们来写入一个 secret
--- apiVersion: install.istio.io/v1alpha1kind: IstioOperatormetadata: namespace: istio-system name: installed-statespec: components: ingressGateways: - enabled: true name: istio-ingressgateway namespace: istio-system pilot: k8s: hpaSpec: maxReplicas: 2 minReplicas: 1 resources: requests: cpu: 512m memory: 512Mi profile: default values: global: istioNamespace: istio-system5这将返回一个 secret_id(你的密钥),获取,base64 ,然后创建一个 kubernetes secret并上传
--- apiVersion: install.istio.io/v1alpha1kind: IstioOperatormetadata: namespace: istio-system name: installed-statespec: components: ingressGateways: - enabled: true name: istio-ingressgateway namespace: istio-system pilot: k8s: hpaSpec: maxReplicas: 2 minReplicas: 1 resources: requests: cpu: 512m memory: 512Mi profile: default values: global: istioNamespace: istio-system6看起来内容比较多,但我们所做的只是告诉 Vault 创建一个密钥。我们可以使用此密钥进行身份验证以进行保管。
配置 cert-manager现在 cert-manager 可以与 vault 通信,让我们配置 cert-manager。
issuer 用于与 vault 对话,传递我们的应用角色密钥和路径。
本处,我们将所有这些东西都放在了 istio-system 命名空间中。
--- apiVersion: install.istio.io/v1alpha1kind: IstioOperatormetadata: namespace: istio-system name: installed-statespec: components: ingressGateways: - enabled: true name: istio-ingressgateway namespace: istio-system pilot: k8s: hpaSpec: maxReplicas: 2 minReplicas: 1 resources: requests: cpu: 512m memory: 512Mi profile: default values: global: istioNamespace: istio-system7然后我们创建一个证书 CRD 来定义我们的证书信息并告诉它把我们生成的证书放在哪里(在这个例子中是 my-cert )。
--- apiVersion: install.istio.io/v1alpha1kind: IstioOperatormetadata: namespace: istio-system name: installed-statespec: components: ingressGateways: - enabled: true name: istio-ingressgateway namespace: istio-system pilot: k8s: hpaSpec: maxReplicas: 2 minReplicas: 1 resources: requests: cpu: 512m memory: 512Mi profile: default values: global: istioNamespace: istio-system8等待 30s ,如果没有意外,那么 cert-manager 将去 vault 请求一个证书,并将其保存为一个可以使用的密钥。
--- apiVersion: install.istio.io/v1alpha1kind: IstioOperatormetadata: namespace: istio-system name: installed-statespec: components: ingressGateways: - enabled: true name: istio-ingressgateway namespace: istio-system pilot: k8s: hpaSpec: maxReplicas: 2 minReplicas: 1 resources: requests: cpu: 512m memory: 512Mi profile: default values: global: istioNamespace: istio-system9最重要的是,我们的证书是否已准备好用作 kubernetes secret?
istioctl manifest install -f ~/istio.cfg0在这个过程中,可以通过 kubectl describe 命令来查看详细信息。。
创建示例应用一切准备就绪,让我们在 web 命名空间中启动一个 nginx pod 虚拟服务。请记住,我们标记了命名空间,因此该命名空间内启动的 pod 也将获得 istio sidecar。
istioctl manifest install -f ~/istio.cfg1对于 istio,我们需要一个 VirtualService 来进行路由。
istioctl manifest install -f ~/istio.cfg2此外,创建一个使用我们来自 vault 的新证书的网关
istioctl manifest install -f ~/istio.cfg3在真实环境中,我们会在 istio ingress 前面添加一个负载均衡器,但是因为我们使用的是 kind,所以本处会将主机添加到 /etc/hosts 并进行端口转发。
istioctl manifest install -f ~/istio.cfg4在我们点击页面之前,让我们从 k8s 中获取公共 CA 并信任它。
istioctl manifest install -f ~/istio.cfg5在浏览器中打开,我们现在可以使用由 vault 签名的有效 TLS 证书访问我们的 nginx 服务器 (https://chris.somecompany.com:8443)!
通过本文,我们学习了如何使用 vault 来保存证书等密钥信息,如何使用 cert-manager 来申请免费的证书以及 istio 如何去使用这些信息,最终实现了一个基于 istio 的安全 web 应用。


还没有评论,来说两句吧...